
This article provides general pet-product and home safety information, not medical diagnosis or treatment. If your dog shows pain, limping, weakness or persistent reluctance to move, consult a veterinarian before using stairs or ramps. See our veterinary disclaimer.
A dog ramp for a car side door has more constraints than a rear-hatch ramp. The door opening may be narrow, the wheel arch may block the approach, and the upper end must rest securely without damaging trim or shifting off a small threshold. This article shows how to measure that actual route before shopping. It is not a guide to changing vehicle restraints. Load the dog only while the parked car is secure, and use an appropriate approved travel restraint after entry. If the dog has pain or limited mobility, consult a veterinarian about safe transport assistance.
Measure the open doorway in three places
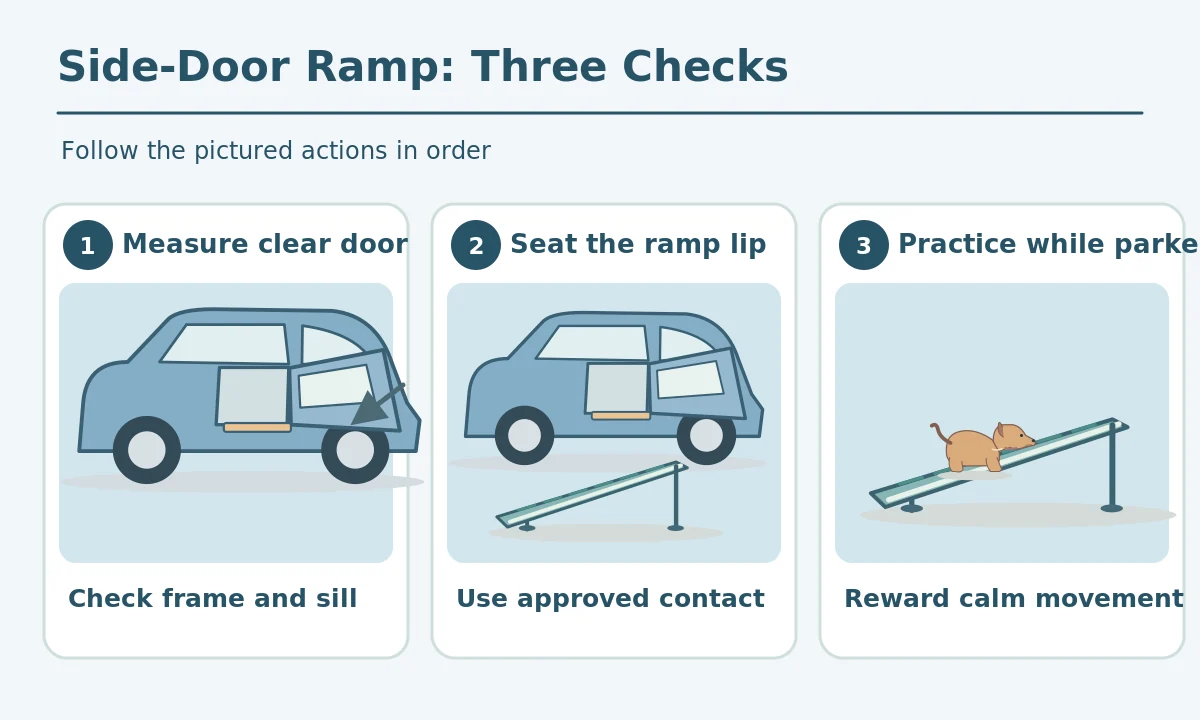
Park on level ground, open the actual passenger door fully, and measure clear width at the threshold, halfway up and where a dog’s shoulders would pass. The widest point of the visible doorway may not be the usable width once hinges, seat edges and door storage pockets are considered. Measure the height from pavement to the stable sill or loading surface. Then note the horizontal space beside the vehicle that is free of traffic, curbs and other parked cars. A ramp that looks fine in a catalog can be impossible to align beside a narrow parking bay. Make a paper sketch with the sill height, doorway width and clear floor run, including the dog’s intended walking direction.
Confirm where the top lip actually rests
A secure ramp has a specific upper contact point, often a rubberized lip or a bracket designed for the vehicle. Do not assume it can rest on painted door trim, a movable seat cushion or the plastic sill cover. Inspect the manufacturer’s instructions for compatible contact surfaces and any needed tie-down. Check that the upper lip stays level when gentle downward and sideways force is applied to the empty ramp. The contact area should not rock over the curb-side edge or a protruding bolt. Never wedge a towel under the ramp lip to compensate for a poor fit; fabric can slide. If the contact point is not stable, do not use the device with a dog.

Choose a workable angle and enough landing space
The steeper the ramp, the more grip and confidence a dog may need. A longer ramp reduces the angle but requires more side clearance. The simplest way to compare options is to lay out the rise and available run on a sketch instead of trusting the word gentle in an advertisement. The ramp should lead directly into an unobstructed footwell or safe loading surface. Check whether the dog must turn sharply immediately after reaching the sill; if so, side-door loading may remain impractical. VCA and Canine Arthritis Resources and Education emphasize a wide, gentle incline with traction and stable support. Do not infer a safe universal angle for every dog.
Inspect deck texture, edge boundaries and frame
A secure top lip alone does not make a ramp safe. Look for continuous traction across the full walking deck, especially at the first and last paw positions. Fine ridges may be easier to clean, while coarse abrasive surfaces may feel uncomfortable on paws. The best choice depends on your dog’s movement, wet conditions and the maker’s guidance. Raised side edges can help dogs stay centered but should not narrow the usable walking surface too much. Check hinges or telescoping locks for full engagement before each session. A ramp that rattles, twists or bows when the empty frame is tested should not be loaded. Respect the product’s weight and length specifications.
Compare side-door loading with rear-hatch loading
A rear hatch may offer a wider opening and a more direct approach, although the cargo-floor height can be greater. A side door may be closer to the dog’s eventual travel position, but its narrow sill and door swing create contact problems. Compare both paths rather than choosing based on which door you use personally. The suitable route should let the dog walk straight, place paws on a stable surface and transition calmly without jumping a large final gap. If neither ramp geometry works, ask your veterinarian or qualified rehabilitation professional about a safe assistance plan. Never substitute a person pulling a collar or lifting by the front legs.

Train beside the parked car with no traffic
Teach the dog what a ramp feels like on flat ground before introducing vehicle height. Use small rewards for stepping onto it voluntarily, then practice a low incline with a stable setup. Progress to the fully secured vehicle ramp only when the dog is comfortable; never force the dog up with a taut leash. Keep the vehicle parked, engine off and the door clear. A second adult may monitor the door and help manage the environment. The American Kennel Club recommends short, positive sessions with the dog choosing to move. Stop if the dog panics, slips, jumps off the side or refuses entry; the setup may be too difficult.
Run a departure and arrival check every time
Before loading, check the parking surface, ramp foot contact, top lip, locking pins and grip deck. Make sure the dog has a clear route and that nearby traffic cannot enter the loading area. Once the dog is inside, remove and stow the ramp fully before driving and secure the dog with a suitable restraint. On arrival, set up the ramp again from scratch; do not expect the slope or ground height to match the earlier stop. Wet pavement, loose gravel and road-edge curbs can alter traction and stability. Keep a safe backup plan if the parking spot does not allow the ramp to be placed correctly.
How We Research
We reviewed current veterinary and pet welfare guidance from VCA Animal Hospitals, American Kennel Club, Canine Arthritis Resources and Education, PetSafe. We compared advice about secure traction, access angles, voluntary introduction and supervised use with the physical setups illustrated here. The drawings show simplified generic equipment rather than specific products or independently tested load ratings. We did not perform laboratory slip, strength or water-rescue testing. Always verify manufacturer instructions and any local building or pool requirements before installation. For more information about our approach, see About HubPet.
Sources
VCA Animal Hospitals, Creating a Comfortable Home for Your Mobility Compromised Dog. Read the original guidance.
American Kennel Club, Dog Stairs vs. Ramps. Read the original guidance.
Canine Arthritis Resources and Education, Assistive Devices for Dogs. Read the original guidance.
PetSafe, Deluxe Telescoping Pet Ramp Care & Use Guide. Read the original guidance.
Safety note: Never force a dog onto steps or a ramp. Inspect the device for shifting and damage before use, and keep children clear of folding hardware. For pain, weakness, a fall or difficulty walking, consult a veterinarian; use urgent care for collapse, trouble breathing or severe injury. Pool exit devices do not replace fencing or attentive adult supervision.
No. Side doors often have different sill shapes, clear widths and parking-space constraints. Confirm the exact contact point and manufacturer compatibility.
Measure the vertical rise and available horizontal run, then compare candidate lengths. Choose a manageable, stable slope for your dog rather than a universal angle.
Only if the manufacturer explicitly permits that contact point. A moving or fragile trim surface is not a safe default support.
Do not rely on a foot or a loose hand as the primary restraint. Use the proper contact lip and any required locks or securing hardware.
Begin on flat ground with voluntary, reward-based practice. Increase difficulty gradually and use the secured ramp at the parked vehicle only when comfortable.