
This article provides general pet-product and home safety information, not medical diagnosis or treatment. If your dog shows pain, limping, weakness or persistent reluctance to move, consult a veterinarian before using stairs or ramps. See our veterinary disclaimer.
Adjustable dog ramps can serve more than one piece of furniture, but only if each height setting locks securely and leaves room for a comfortable approach. A number printed next to a hinge says little about the slope a dog experiences. Examine the actual support mechanism, the ground contact, the surface underfoot and the landing at the top. This article concentrates on furniture-height adjustable ramps rather than folding car ramps or permanent home modifications. A ramp is equipment, not a treatment for painful movement. Ask a veterinarian for individualized mobility advice when pain or balance problems are present.
Separate height adjustment from incline adjustment
An adjustable support leg changes the angle of the deck as well as its top height. Write down the height of each destination: couch, bed or low bench. Then note the floor run that a candidate ramp uses at that setting. Raising the top may make the device much steeper, even if the product’s marketing photo shows a nearly flat surface. Measure the landing at the top, including whether a mattress or cushion compresses. A smooth transition matters; an elevated lip that catches front paws can undo the benefit of the ramp. Do not use an intermediate setting that the manufacturer does not specify as a supported lock position.
Identify the actual locking mechanism
Look underneath the adjustable frame before purchase if possible. Some designs use a fixed metal pin that drops into a numbered notch, others use a brace or a hinged prop with positive stops. A decorative screw knob is not proof that a support cannot collapse. Follow the manufacturer’s instructions and listen or feel for each required engagement. With the empty ramp placed on a level surface, apply modest downward pressure at the middle and upper end to check whether any support shifts. Do not place your hands under a loaded hinge, where a sudden release could trap fingers. Avoid improvising extra holes or wedges to gain a new height setting.
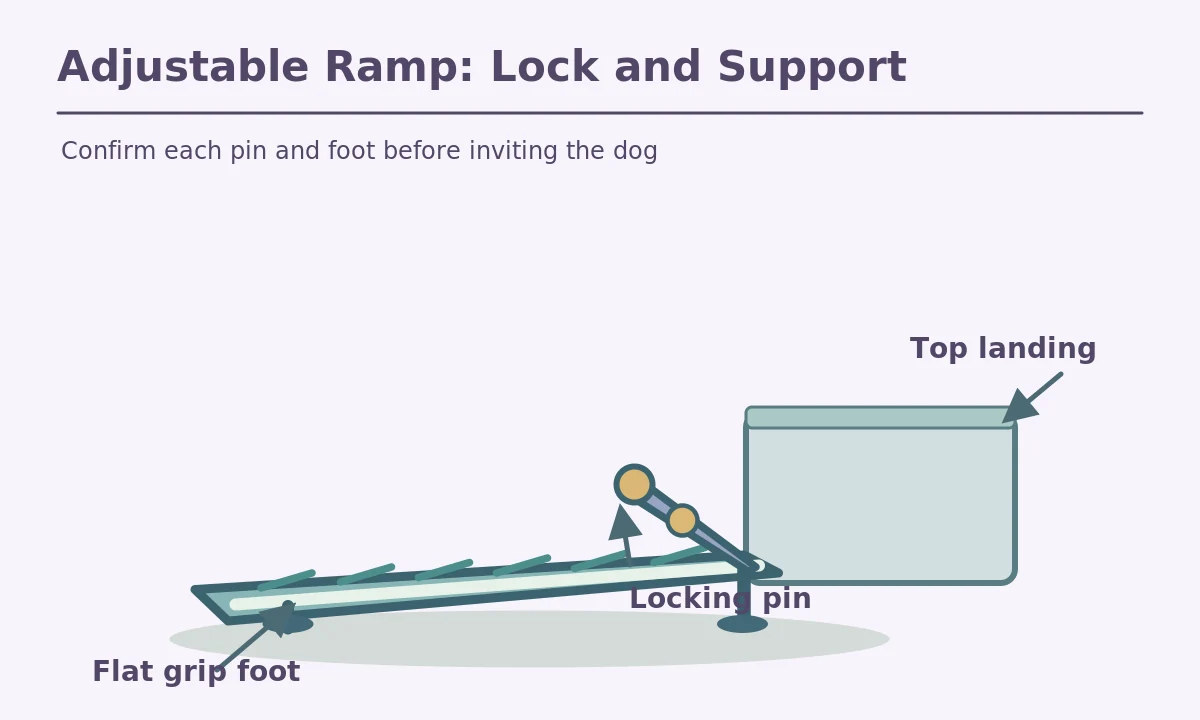
Examine the feet at every approved setting
Changing the angle may shift pressure from one set of feet to another. Check that every designated contact pad rests flat on the floor, without a leg hovering or an edge pressing into a thick rug. On polished floors, test whether the base slides when gentle horizontal pressure is applied to the empty ramp. A wide, secure base can be more important than a high advertised weight capacity. If the model includes a wall or furniture stop, position it exactly as directed. Never stabilize a rocking ramp with books, cushions or rolled towels. Recheck after you move the ramp, because the same product can behave differently on tile, carpet and hardwood.
Choose traction that is kind to paws
Look for a continuous walking surface that gives grip without cutting into paw pads. Carpet, rubberized matting and textured composites feel different; none works equally well for every dog. Loose carpet edges can curl, and stick-on strips can lift when repeatedly washed. Check the manufacturer’s cleaning advice before soaking any adhesive-covered deck. Raised side rails may help mark the path, but they also reduce usable width. Observe whether the dog places its paws near the edges and provide an appropriately wide surface. VCA advises stable, non-slip ramps, while Canine Arthritis Resources and Education emphasizes secure walking width and manageable incline. A grip pad cannot compensate for a slipping base.
Compare a low position with a steep setting
At a low setting, the ramp may have a gentle approach and plenty of clear space at the landing. At its highest setting, the same ramp can become steep enough that a dog hesitates or tries to leap off halfway. It may also sit in the middle of a walkway, creating a hazard for people. Don’t assume that the tallest marked setting is the best setting for the tallest furniture. Check the actual rise, ramp length and the dog’s comfortable gait. If the destination is too high to serve with a reasonable footprint, choose a different access solution. A separate stable lower piece of furniture may be safer than forcing one device to fit every height.
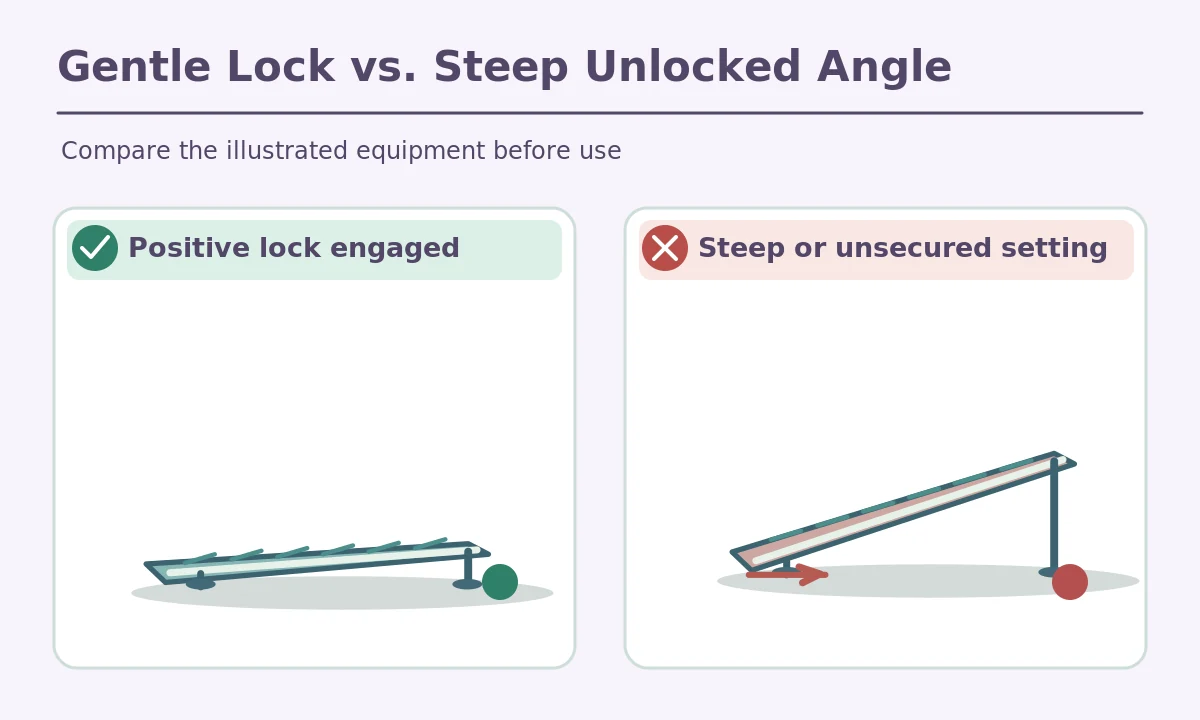
Teach the dog before trying higher settings
Start with the ramp at its lowest secure setting, or flat if the product explicitly permits flat training. Reward the dog for sniffing, stepping on and crossing it voluntarily. Never drag a leash or hold the dog against its will on the surface. Progress in small stages and practice both directions with no sudden excitement at the destination. The American Kennel Club recommends reward-based familiarization and gradual incline increases. Watch the dog’s feet: a backward slide, shortened steps or sudden leap off the side suggests the setup is not comfortable. Stop rather than asking for repeated attempts. If an older dog shows pain or stiffness, seek veterinary guidance before continuing.
Make every adjustment a fresh safety inspection
Before changing height, keep animals and children clear of hinges and support arms. Lower the empty ramp, engage the correct notch or pin, then confirm the base is level and the landing is fully supported. Test the structure with your hand before the dog approaches. Remove hair and debris from locking points according to the manual; inspect for bent hardware, cracked boards or a slipping surface. Store the unit where it cannot fall over, and do not leave it half-folded in a walkway. If a lock stops engaging cleanly, discontinue use until the manufacturer or a qualified technician can address it. Repeat this brief check every time the setting changes.

How We Research
We reviewed current veterinary and pet welfare guidance from VCA Animal Hospitals, American Kennel Club, Canine Arthritis Resources and Education. We compared advice about secure traction, access angles, voluntary introduction and supervised use with the physical setups illustrated here. The drawings show simplified generic equipment rather than specific products or independently tested load ratings. We did not perform laboratory slip, strength or water-rescue testing. Always verify manufacturer instructions and any local building or pool requirements before installation. For more information about our approach, see About HubPet.
Sources
VCA Animal Hospitals, Creating a Comfortable Home for Your Mobility Compromised Dog. Read the original guidance.
American Kennel Club, Dog Stairs vs. Ramps. Read the original guidance.
Canine Arthritis Resources and Education, Assistive Devices for Dogs. Read the original guidance.
Safety note: Never force a dog onto steps or a ramp. Inspect the device for shifting and damage before use, and keep children clear of folding hardware. For pain, weakness, a fall or difficulty walking, consult a veterinarian; use urgent care for collapse, trouble breathing or severe injury. Pool exit devices do not replace fencing or attentive adult supervision.
Only if that setting is manufacturer-approved, positively locked and workable for the dog. The steepest slope may still be too difficult.
Check that all intended feet contact the floor and that the frame cannot rock or slide. Plush carpet may make some supports unstable.
It is a mechanism designed to hold an approved position, such as a fully engaged pin or brace. Verify it according to the product instructions.
No. Rails can guide paw placement, but the usable walking surface must still be wide enough for the dog to move comfortably.
Practice at a low stable setting with rewards and voluntary movement, then increase difficulty gradually while watching for reluctance or slipping.