
A dog playpen is only as secure as the joints between its panels. A tidy rectangle may hide a missing hinge pin, a loose clip, or a narrowing gap where a paw could catch. Connector details vary by manufacturer, so a universal spare part is not automatically a safe match. Before the dog enters, inspect every joint while the pen is empty, read the supplied assembly directions, and make sure the floor remains level. This guide focuses on connections rather than choosing a pen size.
Identify the connector style before assembly
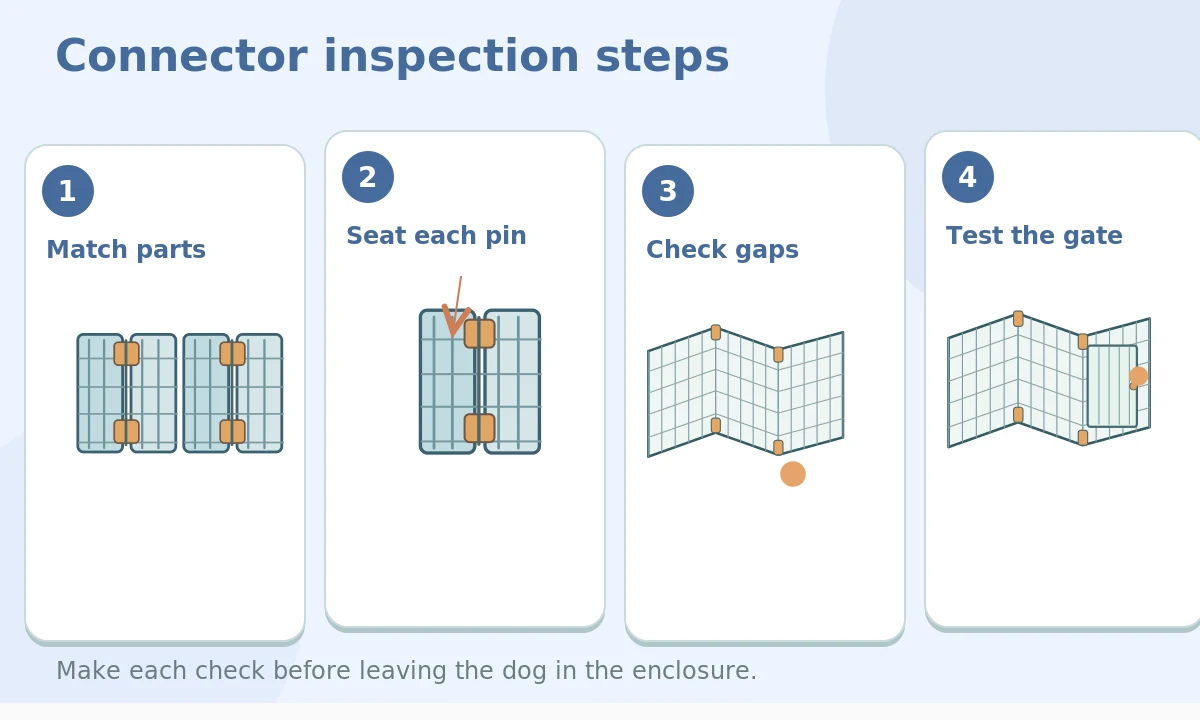
Some exercise pens use linked wire panels, some use separate rods, and others fasten plastic panels with clips or molded hinges. Spread the empty panels on a clean floor and group matching parts by shape. Compare them against the manufacturer’s parts diagram. A rod with a different diameter may seem to fit while leaving a hinge with extra play. If a required connector is missing, do not improvise with tape, string, or a hardware-store hook. Obtain the correct replacement or choose another secure enclosure.
Check for a continuous, fully seated hinge
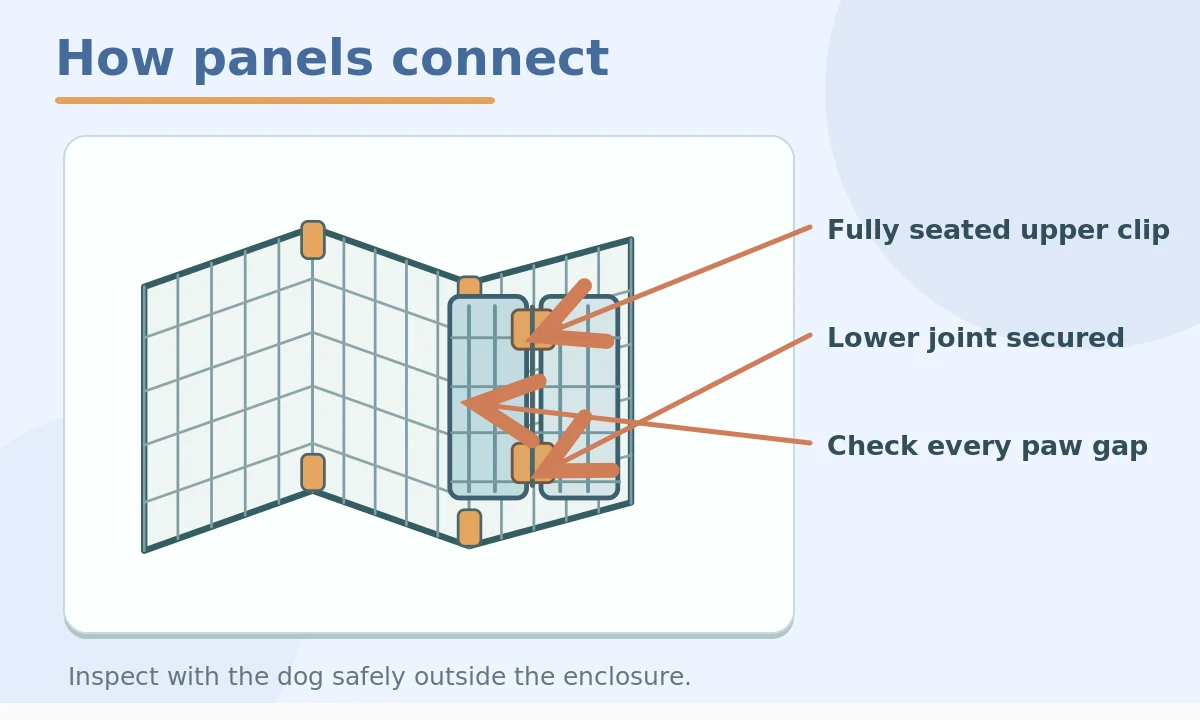
With the pen empty, inspect each connection from the top down. Seat each pin exactly as the manufacturer specifies and engage clips on their intended surfaces. There should be no exposed wire ends or sharp burrs facing the dog. Gently move one panel at a time to locate excessive play. Do not rely on a top connection alone if the design requires both upper and lower fasteners. A joint that bends open under ordinary hand pressure needs correction before use.
Measure paw and muzzle gaps at dog height
A connector can leave a wedge-shaped opening that looks small from above but grows wider lower down. Look along the floor, around corners, and near the gate. Ask whether your particular dog could insert a paw, lower jaw, or nose and become stuck. Do not invent a universal safe gap in inches: the answer depends on your dog’s size, age, and behavior. If the gap changes when a panel flexes, the setup is not ready. Use the intended connector pattern or replace the damaged part.
Keep angles within the intended layout
A pen arranged in a wide zigzag may behave differently from a square or hexagonal shape. Manufacturer instructions sometimes specify which joints may rotate and which require rigid support. Avoid forcing panels around a sharp furniture corner or using a single unsecured span as a room divider. This can stress clips and cause the pen to collapse when a dog leans on it. Choose a shape that rests firmly on the floor and stays away from shelves, cords, heating equipment, and objects that could help the dog climb.
Secure the gate without bridging a seam
If the pen has a swinging gate, test the latch with the enclosure empty. Open and close it repeatedly while watching the nearby joint. The latch should meet its keeper directly, not pull two misaligned panels together. Check the lower gate edge for gaps that could catch nails or toes. A carabiner added as an improvised lock can dangle into a chewing zone or delay an emergency opening. Use the gate hardware intended for that model and keep its release accessible to an adult.
Compare a sound joint with a failing one
A healthy panel connection has matched parts, deliberate contact points, and little unwanted movement. A failing one can show a half-seated rod, outward-bent wire, cracked plastic, or a clip that slips as you move the panels. These differences matter more than how shiny the metal looks. Mark questionable joints with removable tape on the outside while the pen stands empty, then arrange a replacement. Do not leave the tape where a puppy could bite or swallow it. Remove damaged parts from service immediately.
Test stability without putting the dog at risk
After assembly, place the pen on a level surface and apply light hand pressure at several panels. You are looking for unintended folding, skating, or opening at joints. Avoid forceful impact tests; they do not reproduce safe use and can damage an otherwise good product. Read the instructions to learn whether the pen needs feet or anchors. Never attach a leash or tether to the playpen as a substitute for supervision. If the dog moves the pen easily, use a more appropriate barrier or supervised room.
Watch behavior as well as hardware
A puppy that repeatedly gnaws connectors may break plastic or swallow pieces even when assembly is correct. Some dogs climb wire panels or push a pen across a smooth floor. Redirect chewing to suitable activities while supervised and reconsider the enclosure if the behavior continues. Barking, panicked jumping, or frantic biting at barriers suggests confinement may be distressing. A bigger clip or heavier wire will not address that underlying problem. Stop the session and speak with a veterinary or reward-based behavior professional.

Inspect after each fold or move
A connector can shift when you collapse the panels for storage. Before the next use, count the required pieces, look for missing caps, and confirm the gate closes smoothly. Wipe joints clean so dirt cannot hide cracking or corrosion. Store loose pins out of reach of pets and children. Make a photo of the correct setup for your specific product, but do not replace its official instructions with a generic illustration. Repairs should use manufacturer-approved parts where available.
Choose another setup when gaps cannot be fixed
Not every playpen is appropriate for every dog. An unusually small puppy, a strong chewer, or a skilled climber may need a different type of supervised, pet-proofed room. If a joint continually loosens despite correct assembly, discontinue use. The safe solution may be a replacement panel or a different enclosure, not more improvised fasteners. Plan access to water, rest, bathroom opportunities, and human contact regardless of the pen. A playpen should support daily life, not become a punishment or an all-day holding area.
How We Research
We compared current dog-crate and playpen guidance from veterinary teams and animal welfare organizations, then translated the handling and environment principles into practical home-equipment checks. The diagrams illustrate decision points, not manufacturer-approved assembly instructions or crash testing. Follow your own product manual, and stop if the dog appears distressed. Read our about page and veterinary disclaimer. Seek veterinary advice for injuries, pain, sudden mobility changes, or severe confinement distress.
Sources
Cornell University College of Veterinary Medicine: Dog Crates — reference guidance on humane crate or pen use, stable setup, and pet comfort.
RSPCA: How to Crate Train a Puppy — reference guidance on humane crate or pen use, stable setup, and pet comfort.
VCA Animal Hospitals: How to Crate Train Your Dog — reference guidance on humane crate or pen use, stable setup, and pet comfort.
Do not assume a general-purpose carabiner matches the load, opening, or release of the original clip. Seek the correct manufacturer-approved part.
Look along the full height, especially wedge shapes near hinges and the gate. Consider your particular dog and recheck while the panels flex lightly.
Only where its design allows. Follow the model instructions; unexpected folding or loose joints are a reason to stop use.
End unsupervised use, inspect for missing fragments, and change the setup. Ask a veterinarian promptly if pieces may have been swallowed.
Inspect before use after each fold or move, and recheck regularly for shifting, cracks, sharp edges, or loose hardware.