
A dog playpen is only as stable as the connections between its panels. Hinges, supplied clips, corner pins, and the door latch all play different roles. This guide shows what a properly seated connection looks like, how to check the pen on level flooring, and when to retire damaged parts. Use the exact manufacturer instructions and compatible fasteners; the drawings are examples, not an installation diagram for a particular model. No connector guarantees that an unsuitable or distressing enclosure becomes safe. For health-related limits, review the HubPet veterinary disclaimer.
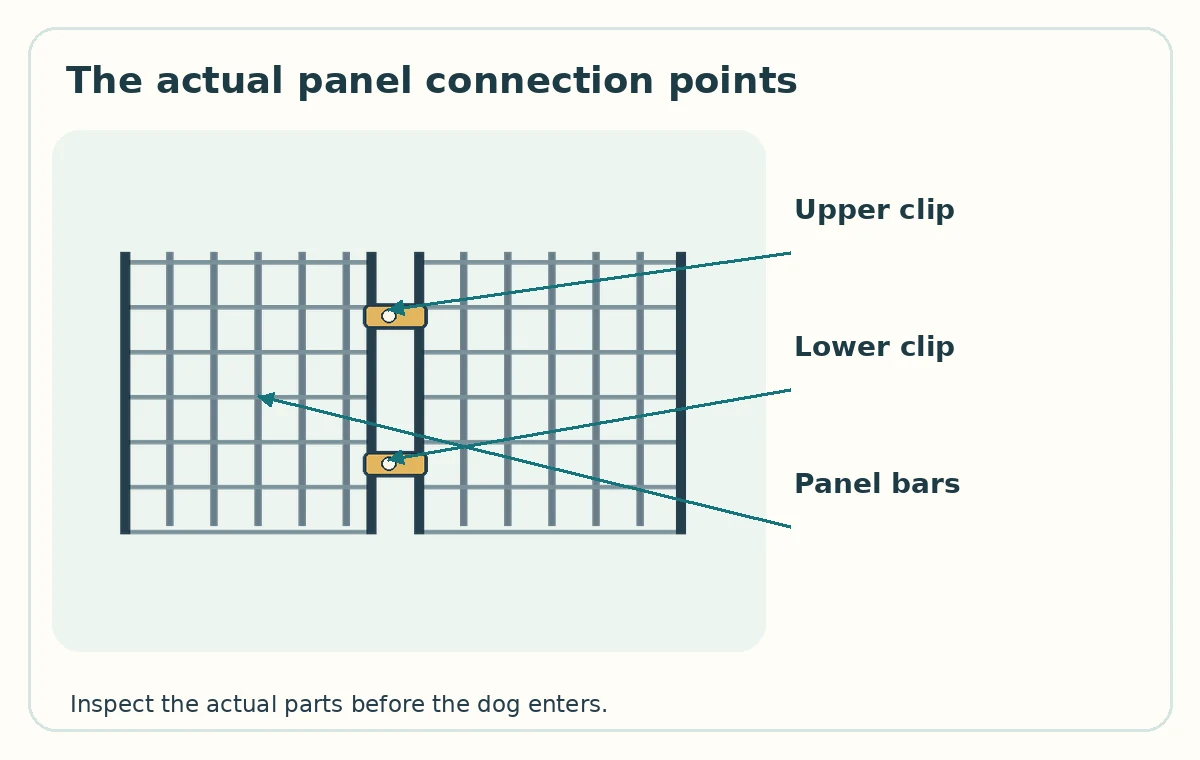
Identify the connection type before setup
Folding wire exercise pens, modular plastic panels, and separate gate sections may use different joins. Some have permanent hinges, while others rely on supplied metal clips or interlocking posts. Find the exact assembly diagram before adding or removing sections. A connector from one brand is not necessarily compatible with another. Check the top and bottom of every joint, because a high clip alone may leave the lower edge free to spread. Keep spare parts away from dogs during assembly.
Follow the intended panel order
Lay out the pen on a clear floor with the door panel in the planned position. Match the manufacturer’s panel sequence, clips, hinge direction, and maximum permitted add-on count. If a connector requires a specific orientation, do not reverse it to make the layout fit a narrow room. Too many panels can make a long straight section unstable. A compact polygon may hold its shape better, but only if the product permits it. No shape is a substitute for the correct fasteners.
Inspect the top and bottom connections
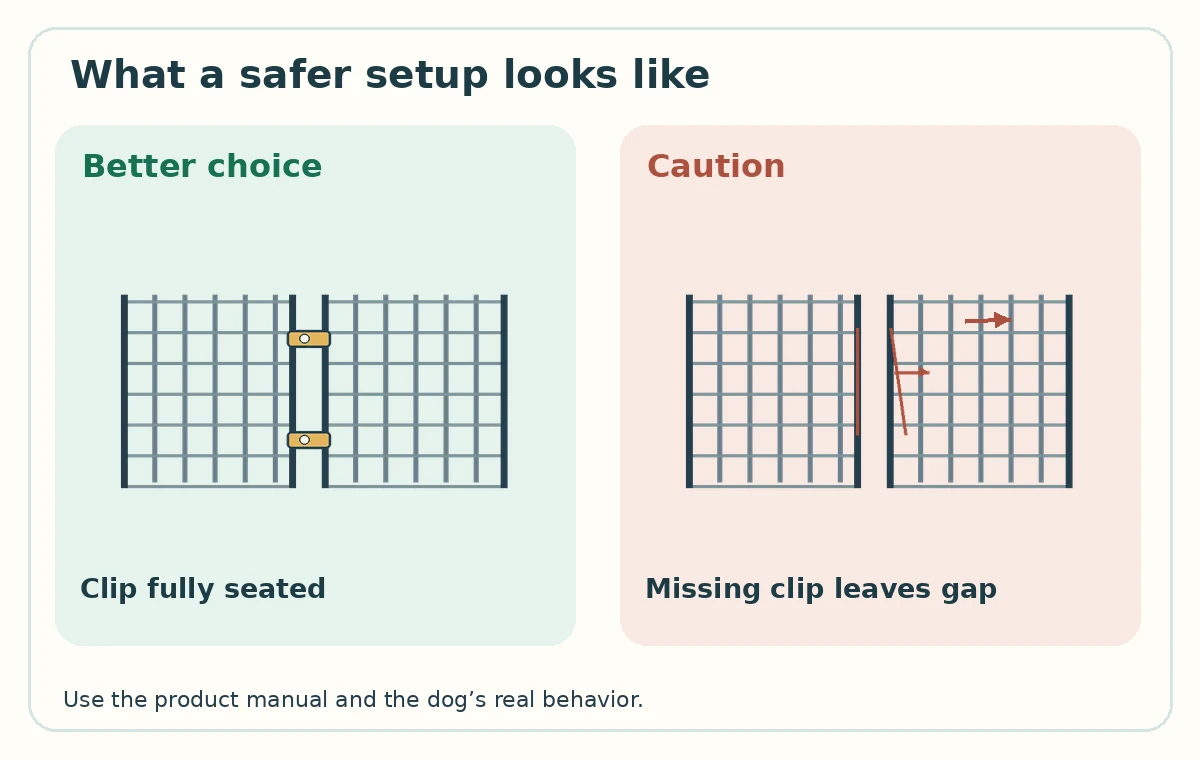
Use a close visual check at each joint. A clip should sit fully where the instructions show, and a pin should not hover above its lower seat. Look for rust, spread-open clips, cracked plastic, and exposed sharp wire ends. If a connector has become bent, replace it with the correct manufacturer part. Avoid electrical tape, zip ties, or household hooks as improvised repairs. These can fail under pressure or become chewing and entanglement hazards.
Check the door panel and lower threshold
A securely joined perimeter can still have a vulnerable door. Close the door and inspect the latch engagement, hinge line, and gap at the floor. A small puppy may probe low openings with a nose or paw. A raised threshold may catch a human foot during cleaning or bowl changes. Test the door while the pen is empty and make sure it opens without pushing nearby panels out of shape. Never pull a dog through a narrow or partly latched opening.
Compare a joined corner with a spreading gap
With an adequately installed connector, adjacent panels meet evenly and the support feet rest on the floor. With a missing or partly open connector, the panels can bow apart when a dog leans against them. The gap may look harmless in a product photo but change with force. Do not attempt a strenuous shake or push test with a dog inside. The correct solution is proper assembly, compatible parts, and an enclosure suited to the dog’s observed behavior.
Check the floor and wall contacts
A pen that slides on tile may loosen its corner shape even when clips are correct. Place it on a level nonslip surface and keep it clear of furniture that provides a climbing step. For outdoor assembly, use only the anchoring parts and ground types named in the instructions, with active supervision. Indoor anchors or wall attachments must also be manufacturer-supported. Do not drill arbitrary holes through panels or tether the pen to an unstable object. Recheck feet after cleaning.
Perform a gentle empty-pen inspection
Before the dog enters, walk around the entire pen. Count every expected connector and compare it with the manual. Check that both ends of each joint sit securely, then gently move the empty pen to spot obvious wobble or spreading. Confirm the door closes normally. Smooth out any floor mat that catches a foot. A successful check reveals no loose parts during ordinary hand contact. It does not prove that a dog cannot escape.
Reinspect after folding and moving
Packing a pen away can twist hinges or leave a clip behind. Open it in the intended orientation, check that each panel is upright, and verify the latch before use. If you lose a clip, do not substitute a different hook or omit the joint. Check for sharp edges after transport and make sure the layout still gives the dog room for rest and movement. A repaired pen should meet the same inspection standard as a new one.

Respond to chewing, climbing, or distress
If a dog chews connectors, climbs the bars, squeezes a gap, or repeatedly throws its weight against panels, supervision and the equipment plan need to change. Stop use while you resolve the risk. A dog that becomes very distressed may need a pet-proofed room or qualified behavior support instead of stricter confinement. Dogs Trust and Cornell emphasize creating a positive environment and respecting the dog’s ability to settle. Hardware checks protect against failure; they cannot replace welfare checks.
Before you decide: a repeatable safety checklist
Use the correct manual to count clips and hinge parts; confirm that each top and bottom connector sits securely. Make sure panels meet evenly without sharp gaps, the door latch engages, and the pen rests flat. Reinspect after every rearrangement or fold. If a dog can push the perimeter apart or chew the hardware, stop and use another managed space. Do not use improvised ties to hide structural damage.
How We Research
HubPet reviewed veterinary and welfare guidance from Cornell University, Dogs Trust, Battersea, and ASPCA. For equipment mechanisms, we also consulted manufacturer instructions. A product manual explains one design. It does not establish identical hardware or capacity across brands. We did not conduct load tests, crash tests, or comparative product trials. Use these steps as conservative at-home inspection points rather than safety certifications. Ask a veterinarian or qualified professional about severe distress, swallowed material, or changes in mobility. See our editorial approach.
Sources
MidWest Homes for Pets — Exercise Pen Assembly Instructions. Used to check the scope and limits of confinement, the equipment design, or the manufacturer-specific setup instructions.
Dogs Trust — Playpen and Crate Training a Puppy. Used to check the scope and limits of confinement, the equipment design, or the manufacturer-specific setup instructions.
Cornell University College of Veterinary Medicine — Dog Crates: When to Use Them and How to Pick One. Used to check the scope and limits of confinement, the equipment design, or the manufacturer-specific setup instructions.
Only when the manufacturers explicitly confirm compatibility. Similar-looking hinge pins or clips can fail to seat correctly.
Follow the exact model instructions. Many designs require secure connections at multiple heights, including near the bottom.
Not automatically. Shape, connector type, floor surface, and the product’s maximum panel count all affect stability.
Do not improvise structural repairs with accessible ties or hooks. Order the correct manufacturer-specified parts.
Remove the dog and reassess connector fit and whether the pen suits that dog. Persistent pushing or panic needs a different setup.